
Kenaf Installation on Ceilings and Walls; Steps, Price, and Key Tips
In the world of modern interior design and construction, speed, efficiency, and a flawless finish are paramount. While traditional methods like wet plastering have their place, dry construction systems have revolutionized how we shape interior spaces.
At the forefront of this revolution is the Kenaf installation, a versatile and reliable method for creating walls, ceilings, and intricate design features. This system provides the perfect blank canvas, which can later be enhanced with a variety of finishes. For instance, while some projects might utilize Decorative Wall Panels to add a final touch of elegance, the underlying perfection of the wall itself is what makes these additions truly shine. Similarly, for rapid renovations, especially in commercial settings, designers might consider Affordable Wall Panels, but for custom-built, durable structures, nothing surpasses the quality of a professional Kenaf installation. This guide will walk you through every aspect of this transformative construction technique.
Kenaf installation
What is Kenaf Installation?
At its core, a Kenaf installation refers to the process of building interior walls and ceilings using gypsum-based plasterboards (often called drywall or gypsum boards) that are screwed onto a lightweight metal or wooden frame. This “dry” construction method eliminates the long drying times associated with traditional “wet” methods like brick and plaster. The result is a smooth, durable, and perfectly flat surface ready for finishing. The system is not just about the boards; it’s an integrated set of components designed to work together seamlessly. A proper Kenaf installation is more than just putting up a wall; it’s an engineering system for modern interiors.
The components of a typical Kenaf installation system include:
-
Gypsum Plasterboards: These are the primary surface panels, made of a gypsum core sandwiched between two layers of heavy-duty paper. They come in various types to suit different needs:
- Standard Boards: For general use in walls and ceilings.
- Moisture-Resistant Boards (MR): Featuring a green paper lining, these are designed for high-humidity areas like bathrooms and kitchens. A critical choice for a long-lasting Kenaf installation in wet zones.
- Fire-Resistant Boards (FR): With a pink paper lining, these boards contain glass fibers and other additives in their core to increase their fire-retardant properties.
- Sound-Resistant or Acoustic Boards: These have a denser core designed to reduce sound transmission between rooms, making them ideal for offices, home theaters, and apartments.
- Metal Framing (Substructure): This is the skeleton of the wall or ceiling. It’s typically made from cold-rolled galvanized steel and includes C-shaped studs (vertical members) and U-shaped tracks (horizontal members for the floor and ceiling). The precision of this framework is fundamental to a successful Kenaf installation.
- Fixings and Accessories: This category includes specialized drywall screws, jointing tape (paper or fiberglass mesh), and jointing compounds (mud) used to seamlessly cover the joints between boards.
Understanding these elements is the first step toward appreciating the complexity and genius behind a high-quality Kenaf installation. It’s a system celebrated for its adaptability, allowing for the creation of not just flat walls but also complex curves, arches, and multi-level ceilings that would be difficult and expensive to achieve with traditional materials.
The Steps of Kenaf Installation
A professional and durable Kenaf installation follows a meticulous, step-by-step process. Rushing any of these stages can compromise the final quality, leading to cracks, an uneven surface, or structural instability. Below is a detailed breakdown of the entire procedure, from initial planning to the final coat of paint.
Step 1: Planning and Layout
Before a single tool is picked up, careful planning must occur. This phase involves marking the exact position of the new walls or ceiling on the floor, existing walls, and ceiling. A laser level is often used to ensure perfect alignment. During this stage, considerations for electrical wiring, plumbing, and HVAC ducting must be made. Outlets, switches, and lighting fixtures are planned for, so the framework can accommodate them. Meticulous planning is the bedrock of every successful Kenaf installation.
Step 2: Building the Metal Frame (Substructure)
This is where the structure takes shape. The U-shaped tracks are first fixed to the floor and ceiling along the marked lines. Then, the C-shaped studs are cut to size and fitted vertically into the tracks, typically spaced at 400mm or 600mm centers. These studs must be perfectly plumb (vertically straight). The integrity of the entire Kenaf installation depends on this rigid and accurately assembled frame. For ceilings, a grid system is created using primary channels and furring channels, suspended from the structural slab above. This framework is what the plasterboards will be attached to, so its stability is non-negotiable.
Step 3: Board Installation (Hanging the Drywall)
Once the frame is complete and any in-wall services (like wiring) are in place, the plasterboards are attached. The boards are carefully measured and cut to size using a utility knife. They are then lifted into position and fastened to the metal studs using specialized drywall screws. The screw depth is crucial; they must be driven just below the paper surface without tearing it. This process, often called “hanging,” is a critical part of the Kenaf installation. The orientation of the boards (horizontal or vertical) and the staggering of joints are important technical details that prevent future cracking.
Step 4: Taping and Jointing (Finishing)
This is the stage that transforms a series of panels into a monolithic, seamless surface. It is arguably the most skillful part of a Kenaf installation and what separates an amateur from a professional. The process involves applying jointing compound (mud) over the seams between the boards and embedding jointing tape into it. This is typically done in three layers:
- The Bedding Coat: A layer of compound is applied, and the tape is pressed firmly into it, removing all air bubbles.
- The Filler Coat: A wider layer of compound is applied over the tape to fill the seam and feather the edges.
- The Finish Coat: A final, even wider, and thinner layer is applied to create a perfectly smooth and flat surface.
Screw heads are also covered with compound at each stage. A seamless finish is the ultimate goal of any high-quality Kenaf installation. After the main structure is complete, a designer might consider applying unique textures. For instance, a plastic thermowall could be installed over a section of the finished drywall to introduce a modern, three-dimensional element to the room.
Step 5: Sanding
After the final coat of jointing compound is completely dry, it must be sanded smooth. This is a dusty and messy job but is essential for achieving a flawless surface. Professionals often use pole sanders for large areas and sanding sponges for detailed work. The goal is to eliminate any tool marks, ridges, or imperfections, ensuring the wall is perfectly flat and ready for priming. This final touch is what validates the precision of the Kenaf installation.
Step 6: Priming and Painting
The final step is to prepare the surface for decoration. A high-quality PVA (polyvinyl acetate) drywall primer/sealer is applied first. This is a critical step because the paper surface of the plasterboard and the dried joint compound absorb paint at different rates. The primer equalizes this absorption, ensuring the final paint coat has a uniform sheen and color. Once primed, the surface created by the Kenaf installation is ready for any paint, wallpaper, or other decorative finish.
The Price of Kenaf Installation
Determining the exact cost of a Kenaf installation can be complex as it depends on a multitude of factors. It’s not just about the price per square meter; it’s about the complexity, materials, labor, and level of finish required. A simple partition wall will cost significantly less than a multi-level curved ceiling with integrated lighting. The cost of a professional Kenaf installation is an investment in quality and durability.
Here are the primary factors that influence the price:
- Project Complexity: A straight wall is the most affordable. Curves, arches, niches, and multi-level ceilings require more skill, time, and material, thus increasing the cost of the Kenaf installation.
- Type of Plasterboard: Specialized boards like fire-resistant, moisture-resistant, or acoustic boards are more expensive than standard ones.
- Labor Costs: This varies significantly based on geographic location and the experience of the installation crew. A highly skilled team may charge more, but their efficiency and quality can save money in the long run.
- Level of Finish: The industry uses a scale (Level 0 to Level 5) to define the quality of the finish. A Level 5 finish, which is the smoothest and most pristine, requires a full skim coat over the entire surface and is the most expensive.
- Ancillary Costs: This includes costs for insulation within the wall cavity, waste disposal, and any necessary structural preparations.
In commercial spaces, the finish over the drywall is also a major cost factor. For example, in a high-end office, the cost of the basic Kenaf installation might be supplemented by the application of a sophisticated PVC reception wall, which adds branding and a premium feel.
Here is a general cost breakdown table to provide a clearer picture:
| Service / Material | Description | Average Cost Range (per square meter) |
|---|---|---|
| Materials Only (Standard) | Includes standard plasterboard, metal studs, screws, tape, and basic compound. | $15 – $25 |
| Labor for Basic Installation | Includes framing, boarding, and a standard Level 3-4 finish for a simple wall or ceiling. | $30 – $50 |
| Complex Design Installation | Labor for features like curves, arches, or multi-level ceilings. | $60 – $100+ |
| Specialized Boards (e.g., Acoustic) | Additional material cost compared to standard boards. | +$5 – $15 |
| Level 5 Finish | Includes the labor and material for a full skim coat for a flawless, premium surface. | +$10 – $20 |
Ultimately, a detailed quote from a reputable contractor is the best way to understand the cost for your specific project. A well-priced Kenaf installation balances cost with quality for a lasting result.
Advantages and Disadvantages of Kenaf Installation
Like any construction method, Kenaf installation has its own set of pros and cons. Understanding these helps in making an informed decision about whether it’s the right choice for your project.
Advantages
- Speed of Installation: This is perhaps the biggest advantage. A Kenaf installation is significantly faster than traditional brick and plaster, reducing labor costs and overall project timelines.
- Design Versatility: The system’s flexibility allows architects and designers to create shapes and forms—from sweeping curves to sharp, modern lines—that are difficult and costly to achieve with other methods. The creative potential of Kenaf installation is nearly limitless.
- Smooth Finish: When done correctly, the finishing process results in a perfectly flat, seamless surface that is ideal for modern and minimalist aesthetics.
- Lightweight: Gypsum board walls are much lighter than masonry walls, which reduces the structural load on the building’s foundation. This is a major benefit in both new construction and renovations.
- Fire and Sound Performance: With the use of specialized boards, a Kenaf installation can offer excellent fire resistance and sound insulation, enhancing the safety and comfort of a space. Modern design often combines this with other materials; for instance, after a wall is built, many homeowners add elements like Termowall to create a warm, textured feature wall.
Disadvantages
- Susceptibility to Water Damage: Standard gypsum boards are not water-resistant and can degrade, swell, or grow mold if exposed to significant moisture. While moisture-resistant boards mitigate this, a Kenaf installation is not ideal for areas with constant water exposure.
- Lower Impact Resistance: Compared to solid plaster or brick walls, drywall is softer and more prone to dents and holes from impacts. However, repairs are generally easy and inexpensive to perform.
- Skill Dependent: The quality of the final finish, especially the taping and jointing, is highly dependent on the skill of the installer. A poor job can result in visible seams, tool marks, and an uneven surface, undermining the entire Kenaf installation.
- Dust Creation: The sanding process creates a large amount of fine gypsum dust, which can be a nuisance and requires thorough cleanup and respiratory protection for workers.
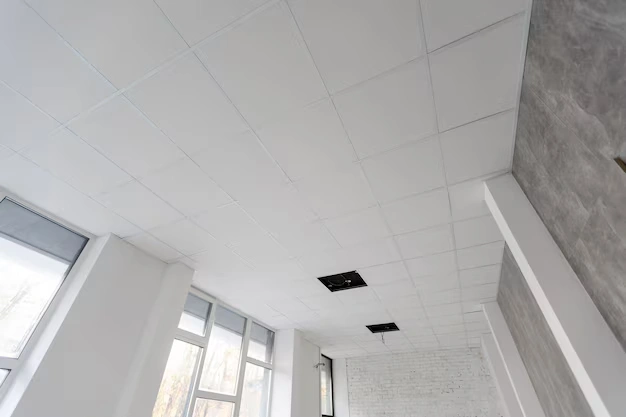
For ceilings, while a smooth painted finish is standard after a Kenaf installation, some projects integrate specialized systems. Elements like Ceiling tiles for home can be used within the Kenaf grid to provide better acoustics or easier access to the ceiling plenum.
Kenaf installation
Design Ideas with Kenaf Installation
The true beauty of a Kenaf installation lies in its creative potential. It provides a canvas for designers to sculpt interior spaces in innovative ways. Here are some popular and inspiring design ideas that are made possible or easier with this technology.
Layered False Ceilings with Cove Lighting
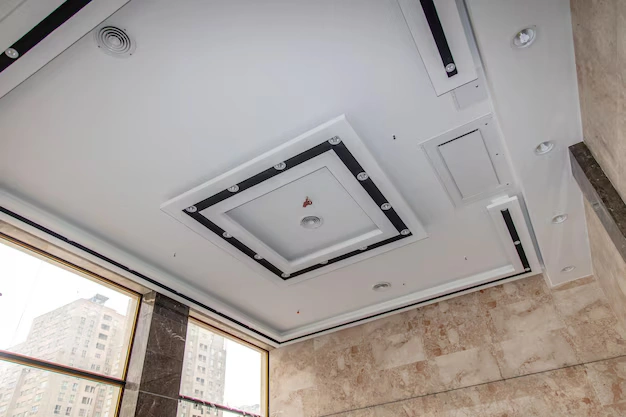
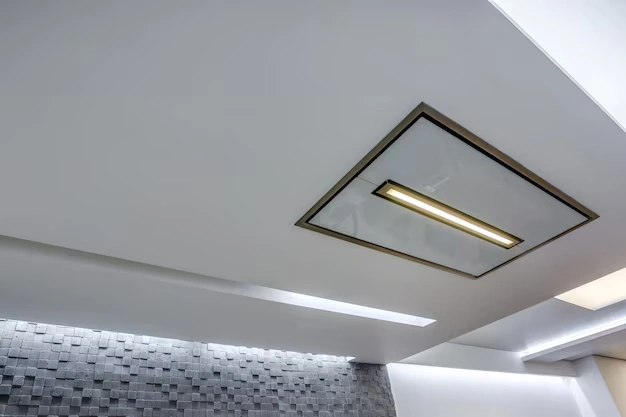
One of the most popular applications of Kenaf installation is creating multi-level or “tray” ceilings. By dropping sections of the ceiling at different heights, you can create visual interest and define different zones within a large room. The gap between the levels is perfect for installing hidden LED strips (cove lighting), which provide soft, indirect ambient light that adds a sense of luxury and sophistication. This complex geometry is a hallmark of a master-level Kenaf installation.
Custom-Built TV Units and Feature Walls
A Kenaf installation allows for the creation of bespoke media walls that seamlessly integrate a television, speakers, and shelving. You can design niches for electronic devices, recessed shelving for decor, and even hidden compartments for wiring. This creates a clean, decluttered, and highly functional focal point in a living room. The flexibility of the system allows you to design a wall with recessed sections perfect for installing a modern material like Termowall for a stunning visual contrast.
Graceful Arches and Curved Walls
Drywall’s ability to be curved opens up a world of design possibilities. By using flexible plasterboards or kerfing standard boards (cutting slits in the back), installers can create beautiful arches between rooms or soft, flowing curved walls that guide movement and add an organic feel to a space. This type of advanced Kenaf installation can transform a boxy room into a dynamic and elegant interior. For urgent renovation projects, an Affordable Thermowall might offer a quick fix, but it cannot replicate the custom architectural forms achievable with a proper Kenaf installation.
Seamless Room Partitions
Whether you need to create a home office in an open-plan living area or divide a large bedroom into two smaller ones, a Kenaf installation is the ideal solution. Partition walls can be erected quickly with minimal disruption. They can be insulated for sound privacy and are strong enough to support doors, shelving, and fixtures. In large living rooms, a multi-level ceiling created via a Kenaf installation can be further enhanced with decorative elements like Ceiling tiles for home in specific sections to add texture and style.
When considering the final surface finish, the debate between different materials is common. A homeowner might weigh the pros and cons of a simple paint job versus a more durable or luxurious finish. Options like a Marble Sheet or Ceramic-style panel can be applied directly over the perfectly smooth surface created by the Kenaf installation, offering a high-end look without the weight and expense of real stone. The quality of the underlying Kenaf installation is what makes these premium finishes possible.
Conclusion
The Kenaf installation system is far more than just a method for building walls; it is a cornerstone of modern interior construction and design. Its unparalleled combination of speed, versatility, and performance has made it the go-to choice for residential, commercial, and retail projects worldwide. From creating simple, clean partition walls to enabling complex and imaginative architectural features, the possibilities are vast.
While the process requires skill and precision, particularly in the finishing stages, the results speak for themselves: a flawless, durable, and beautiful interior ready for any decorative vision. Ultimately, a well-executed Kenaf installation is not an expense, but a fundamental investment in the aesthetic and functional quality of a space. It provides the perfect foundation upon which stunning interiors are built, proving that what lies beneath the paint is just as important as the color itself. For any modern renovation or construction project, mastering the art of Kenaf installation is key to success.
Frequently Asked Questions about Kenaf Installation
Is Kenaf installation messy?
Yes, particularly during the sanding phase. The process generates a significant amount of fine white dust that can spread throughout the property. Professionals use dust extraction systems and plastic sheeting to contain the mess, but a thorough cleanup will be necessary after the job is complete.
How long does a typical Kenaf installation take?
This depends entirely on the project’s scale and complexity. A single small partition wall might be framed, boarded, and finished in 2-3 days (including drying time for the compound). A complex ceiling in a large room could take a week or more. A major benefit of Kenaf installation compared to wet plaster is the drastically reduced drying time.
Can I hang heavy objects like TVs or cabinets on a Kenaf wall?
Absolutely, but you must use the correct fixings. For heavy items, it’s essential to locate the metal studs within the wall and screw directly into them. If a stud isn’t in the desired location, special heavy-duty drywall anchors (like toggle bolts or snap toggles) can be used to securely fasten items to the plasterboard itself.
Is Kenaf installation suitable for bathrooms and kitchens?
Yes, provided the correct materials are used. For these high-humidity areas, a Kenaf installation must be done using moisture-resistant (MR) plasterboards. These boards have a special green paper liner and a core treated with additives to resist moisture and prevent mold growth. For areas with direct water contact, like shower enclosures, a cement backer board is recommended instead of gypsum board.
What is the difference between a Level 4 and a Level 5 finish?
A Level 4 finish is the standard for most residential applications. It includes three coats of compound on all joints and screws, sanded smooth and ready for priming. A Level 5 finish is the highest quality. After Level 4 is complete, a thin skim coat of joint compound is applied over the entire surface of the wall or ceiling. This creates a perfectly uniform, flawless surface, which is ideal for areas with high gloss paints or critical lighting that would highlight any minor imperfections. Achieving this level of quality is the pinnacle of a professional Kenaf installation.


